How To Illustrate A Book And Self-Publish Your Artwork
Most artists dream of having their art in a book. If your topic is niche or you are a first-time author and illustrator, it will be much harder to get your work published traditionally. So self-publishing your work might be an option for you. If you aren't sure where to begin, how to illustrate a book and self-publish, this guide is for you.
In this post, I will be using my colouring book project as an example of how I break down large projects. I also dive into self-publishing methods by which artists can create their own books without paying big bucks to print them to get them in front of the right audience.
The advantage of self-publishing a book is that any book can get published within days or weeks at most. The artist has complete control at every stage of the process. You can also work with fellow professionals to edit and create something aligned with your vision.
Since the books are not printed in advance and stored, it is easy to make changes if something isn't working well. For example, any typographical errors can be corrected later.

Books that are published traditionally can have a shorter lifespan. They are periodically removed to make room for new books. However, as long as your self-published book is available on search engines, it will still be in demand.
Self-publishing your work can come in two ways. You can either sell it as an e-book or through a print-on-demand service. We will discuss this further down below.
If you are interested in selling your art through a book, I have shared my process of approaching such a complex topic below. I am breaking down the process of how I worked on my colouring book and how I plan to self-publish it.
Start with a list
Make sure you research your topic and list the things you want to achieve with your book. For the colouring book, I started by researching Australian birds. I made a list of birds that I thought would be good candidates for the subject. I tried to ensure a good variety of common birds and a few strange, unknown ones. I sent this list to a bird-enthusiast friend to see if I missed any important ones and if some should be dropped off.
Mood boards and references
As you guys know, I am a huge fan of Pinterest, and I enjoy using the platform to gather references and create boards for my research. I also use Unsplash, Pixabay and Pexels for royalty-free images.

At first, I explored other colouring books to get ideas of how other illustrators tackled the drawings. Colouring books can come in different levels of detail, and I needed a benchmark of where I wanted my work to be.
During this research phase, I also gathered references for each bird. I tried to look for interesting photos that captured the personality and attitude of each bird in its natural habitat.
Organise and track your work
You need a system to track the overall progress of your art project. You can use paper and pencil or fancy apps; that is up to you. I recently discovered the planning app Notion and enjoyed adding my colouring book list to it. I rated each bird on difficulty level to estimate which ones were going to take longer than the others.
Each bird was rated by what stage of completion it was in to track the progress of the illustrations – yet to begin, drawing done, more work needed, done, and final. 'Done' was to represent when a whole illustration was completed. Sometimes I needed to go through each illustration and tweak it further, and then it got marked as 'Final'.
![]()
I even noted down what I shared on social media in my template.
I also tried to track how long each bird took to complete. This can really help you understand your workflow and how long each piece takes you to finish. If you want to get hired as an illustrator, this information is invaluable. As you can see, my tracking was inconsistent, but I did learn a lot by doing it. Hopefully, I will remember to track it better with future projects.
Thumbnails and small sketches
While in the planning stages, thumbnail sketches can help you experiment with different methods and compositions without losing time or effort. You can flesh out your ideas and see what works and what doesn't.

I used Photoshop to draw and sketch out rough arrangements to experiment with the composition of each illustration. I try to capture the bird's attitude and mood in the sketching phase without going into the details. Some illustrations might need many little thumbnail sketches to find what works best.

Following this process, I try to elaborate on each rough sketch with more details. This technique reduces the guesswork during the final phase when I turn it into a vector image in Illustrator.
Vectorising in Illustrator
Once I have a drawing that I like, I take it to Illustrator, where I trace over the drawing to vectorise it. I have made my own brushes that work well for my process. I use a variety of strokes, thicknesses and grey intensities to create the illusion of depth. It is easy to get caught up in the details while working digitally and zoomed in, so always zoom out and check your whole artwork from time to time.

When you are working on your book, this stage might involve adding colour instead.
Experiment with styles
Your first few illustrations should be about testing different styles and detail levels. Pick a couple of drawings to set the tone of the book and try to match every subsequent drawing to them. Once you find a style that you like, stick to it. If you don't follow this step, you could get some drawings that are far too detailed or a style that is inconsistent throughout the book.

In the example above, I chose to stick with the second version. The first one was far too detailed for the way I wanted my colouring book to appear.
Marketing your book
Make sure to entice your audience with little snippets of your creations to excite them about the arrival of your new product. While creating your book, share it with your followers using social media. Your blog or website is another great platform to give your audience a detailed prelude to what to expect. Your job is to market your book so that the right people see it and get curious about your new product. Encourage people to tell friends about your book and give them an incentive to do so.
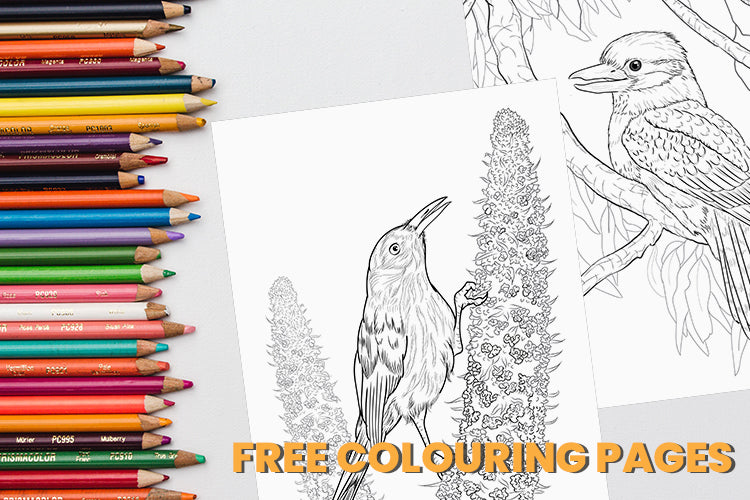
Are you tempted to try colouring these pages in? Download 10 free colouring pages here. (See what I did there? ;-) )
Get feedback
While you are sharing your new product, make sure to ask for feedback. Ask fellow artists, friends, family members and your followers. It is a good way to gauge how your book will be received and anything you could do to improve it. Don't forget to share it with specialists to proofread your work.
How to sell your book
When self-publishing a book, the title can make or break the item’s sales. Examine other books, their titles, cover designs, and typography to apply what works in your genre.
You can self-publish your book while taking advantage of the benefits a print-on-demand business model has to offer. These companies provide the ability to convert your manuscript into publishing formats easily. They also offer access to a few retail platforms. Some companies provide enhanced distribution, marketing and promotional assistance too. Ingramspark, Lulu, Amazon KDP are a few that I am familiar with.
Authors also have the option of selling their books as a digital download on their personal websites. You might need to set up a shopping cart function, and you are set to make your first sale. A reader can visit your site, order and download your book – it’s completely automated.
You can even sell it as a digital download on sites like Etsy. Amazon and Google Play have options to sell your book as an E-book.
When choosing a platform to sell your book, make sure that your intended audience uses it.
I will be selling my book on my website and through Etsy because this system has worked for me in the past.
As you can see, creating your own book is no easy task, but if you do want to try it, I highly recommend it. I made my first colouring book two years ago, and I still get sales without putting much work into it since completion.
If you want tips on creating an audience, building an art community, and growing an art business, make sure to subscribe to my newsletter. I share insider tips and tricks that only my subscribers have access to.